Sale!

Dentsply Propex Pixi Apex Locator

Original price was: ₹55,000.00.Current price is: ₹36,949.00.

Pickup from nearby metro station or get it home delivered

Check the list of all pickup points at metro stations

Features

  • Dentsply Propex Pixi Apex Locator is a device aimed at detecting the minor apical foramen based on the analysis of electrical properties of different tissues inside the root canal system.
  • It provides control and comfort with its multi-frequency apex locator technology working in dry and wet canals. It requires no calibration and zero adjustment. See it. Hear it.
  • The Propex Pixi features dual control by visually displaying the file progression in the root canal and a progressive sound control with 4 volume levels.
  • It is powered by a rechargeable battery thus eliminating the need for frequent battery replacement.

Description

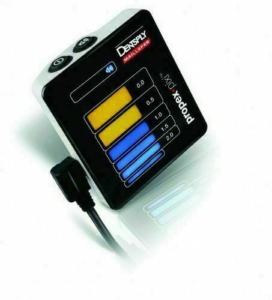
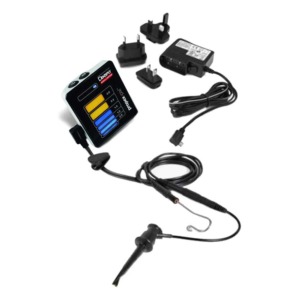
The ProPex Pixi Apex Locator is another innovative solution from Dentsply Sirona & Maillefer, encouraging the standard of care in Endodontics and assisting clinicians to deliver more predictable endodontic outcomes.

 INDICATION:

  • It is an electronic device used for apex location during root canal treatment for determination of precise working length.It must only be used in hospital environments, clinics or dental offices, by qualified practitioners.

 CONTRAINDICATION:

Propex Pixi is not recommended for use:

  • In patients who have a pacemaker or other implanted electrical devices, or have been cautioned by their physicians against the use of small electric appliances such as shavers, hairdryers, etc
  • In patients allergic to metal
  • In children

 ADVANTAGE:

  • Provide objective information with high degree of accuracy.
  • Reduces the number of radiographs which needs to be taken so minimizes time.
  • Reduces pain and discomfort in the patient.
  • The small, pocket-sized device takes up minimal space during treatment, storage and transportation, making it accessible for every endodontic treatment.
  • Helpful for detecting perforations.

 Please Note: Accuracy in readings for apex locators is claimed to be 97.7% accurate. Readings may vary from the conventional method of working length determination (radiographic method) & may fluctuate in cases where the precautions (recommended in user manual) are not followed

Directions For Use

STEP:1 

  • Connecting the AC Plug Adapter;
    Select the plug adapter that matches your electric power outlet.

STEP:2

  • Recharging the Battery;
    Propex Pixi® is equipped with a rechargeable battery. When the battery is low, blinking battery icon appears on the status bar of the device indicating that the battery requires recharging. When the battery icon is blinking, the battery requires recharging. However, it is still functional for several treatments before the device
    shuts down.
    Procedure for recharging the battery:
    1. Complete the measurements and disconnect the measurement
    cable from the patient;
    2. Unplug the measurement cable from the device;
    3. Connect the charger cable to Propex Pixi®;
    4. Connect the charger to the mains. While charging, the charger and the device should be outside the patient environment (at least 1.5 mm from the patient).
    During battery charging the battery symbol will first blink then will remain steady when charging is completed.
    Duration of charging: Approximately 12 hours (24 hours after a long period of non-use).
  • Note;
    Propex Pixi® cannot be used while charging.

STEP:3

  • Cable Connection Test
    A connection test feature is included in Propex Pixi® in order to check the cables:
    1. Connect the measurement cable and turn on the device.
    2. Connect the metal part of the connection hook to the lip clip. Make sure that the accessories are cleaned properly before the test.
    3. “Connection test” icon should appear on the status bar.
    4. If no icon appears, the connection hook or the measurement cable
    should be replaced.

STEP:4

  • Apex localization;
    Disconnect the charger from the device if connected.
    1. Before connecting the measurement cable with the attached lip clip and connection hook to the patient, plug measurement cable into the device and turn on the device by pressing the “ON / OFF” button on the top of the device. The first bar will start blinking.
    2. Attach the lip clip to the patient.
    3. Gently insert the file into the canal.
    4. Connect the connection hook to the metal shaft of the file.
    The first bar will stop blinking accompanied by a double beep signal.No other adjustments are required before starting apex localization.
  • Note;
    To ensure optimal performance the file size should be adjusted to the canal diameter.
  • Advance the file with slow clockwise turns. In the pre-apical zone bar, 2.0 turns on and an audio signal sounds. As the file progresses in the canal, subsequent bars turn on gradually and the interval between the audio signals becomes shorter. If the bar graph suddenly makes a large movement in the upper part of the canal, continue slightly towards the apex so the signal returns to normal.

STEP:4

  • Apical Zone;
    The apical zone is divided into 3 bars graduated from 1.0 to 0.0 (apex)
    When the apex is reached, a solid tone is emitted.
    The indication 0.0 on the Propex Pixi® screen relates to the minor apical foramen file position (the apical length).
  • Over-Instrumentation;
    A red “OVER” segment and an audio warning signal (rapid intermittent signal) indicates that the file has passed the apex.

STEP:5

  • Completion of the measurements;
    Before unplugging the measurement cable from the device receptacle disconnect the lip clip and the connection hook from the patient.
    Move the file stopper to the selected reference point on the tooth.
    Gently remove the file from the canal and measure the apical length between the stopper and the file.

STEP:6

  • Sound Adjustment;
    Propex Pixi®
     is equipped with an audio indicator that enables monitoring of the progression of the file within the canal in addition to visual monitoring.
    The volume can be adjusted to four different levels: mute, low, normal
    and high, by successively pressing the “VOLUME” button.

STEP:7

  • Demo Mode;
    The built-in demo mode is available to become acquainted with the device and to demonstrate its operation.
    1. Disconnect the measuring cable or the charger from the device, if connected, and turn the device off.
    2. To start the demo mode, press and hold the “ON / OFF” button for about 2 seconds. until the whole display turns on and immediately turns off again accompanied by two beeps.
    3. During the demo cycle, the device operating sequence is shown on the screen.
    4. Demo cycles are repeated automatically until interrupted by the operator.
    5. To exit the demo mode press the ”ON / OFF” button and hold for about 1 second until a beep sounds. The device shuts down.
  • Propex Pixi® automatically shuts down after 3 minutes of non-use. In order to prolong battery life, it is recommended to switch the device off after usage by pressing the “ON / OFF” button.

STEP:8

  • Cleaning, Disinfection, and Sterilization

Specifications

WARNING:

  • The scale indication on the Propex Pixi® screen does not represent a distinct length or distance in mm or other linear units. It simply indicates the file progression towards the apex;
  • The following patient-related factors may prevent accurate readings:
  • Blocked root canals;
  • Teeth with large apices;
  • Root fracture or perforation;
  • Metal crowns or bridges, if they come into contact with the file or the lip clip.
  • Inaccurate or incorrect readings due to the environment are likely to  occur in the following cases:
  • Presence of portable or movable radio frequency transmitters in the surroundings;
  • Film viewers or other Illumination devices that use an inverter may cause abnormal operation of the apex locator. Such devices should be turned off during use of the Propex Pixi®;
  • Electromagnetic interference could cause improper operation of the device. In such cases, the device behavior may become abnormal or random. Usage of any devices emitting electromagnetic radiation, such as cellular phones, remote controls, transceivers, etc., should be prohibited in the vicinity of Propex Pixi®.

GENERAL SAFETY WARNING:

  • In order to prevent infectious agent transfer, it is highly recommended to use a rubber dam system during the endodontic procedure.
  • Make sure that the lip clip, hook or fork does not come into contact with an electric power source such as an electrical socket. This could result in a severe electrical shock.
  • Do not use Propex Pixi® in the presence of flammable substances.
  • Only use the original charger.
  • Use AAA 1.2V 1000mAh NiMH rechargeable batteries only.
  • The usage of non-rechargeable batteries may cause device damage.

Contents

  • 1 Pixi Apex Locator
  • 1 x Measuring wire
  • 1 x Connection hook
  • 2 x Lip clips
  • 1 x Charger
  • Instructional Manual

FAs

1. What is a dental apex locator?

A dental apex locator is an electronic device used in endodontics to determine the position of the apical foramen and therefore the length of the root canal space.

2. How does a Dentsply Propex Pixi apex locator work?

All apex locators have two electrodes, one connected to an endodontic instrument, the other connected to the patient’s body. The electrical circuit is completed when the instrument is inserted into the root canal in the apical direction and touches the periodontal tissues.

3. What is the apex of the tooth?

In anatomy, the apical foramen is the opening at the apex of the root of a tooth, through which the nerve and blood vessels that supply the dental pulp pass. Thus it represents the junction of the pulp and the periodontal tissue.

Warranty

  • Manufacturer/Importer warranty of 1 year as applicable for this product
  • Service and Warranty are handled by the manufacturer/importer directly for this product (Currently OnSpot Services only available in Delhi/NCR )
  • Deyo will not be liable to replace the Products and the liability to replace any such Product is that of the Manufacturer/Importer
  • Deyo and the Buyer acknowledge that the Products purchased/used are a subject matter of original Manufacturer/Importer’s warranties only
  • Any or all claims in relation to returns and replacement shall be made to the concerned Manufacturer/Importer only and Deyo may assist the customer in registering a request to get the Product replaced or serviced. 
  • The Buyer acknowledges that the Products once sold will not be exchanged or taken back unless the seal of the package or the Product is intact or not altered in any manner or is not tampered as the case may be.